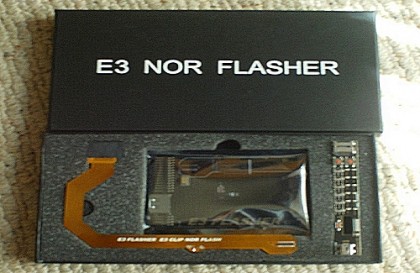
The purpose of this tutorial is to demonstrate the least expensive / most minimal way to downgrade a Sony Playstation 3 with an E3 Flasher. Therefore it utilizes only the E3 clip / board (I.E. not the E3 Limited bundle) and does not need an eSATA cable or dock. Instead of a specific jailbreak dongle, we will be using a Sony PSP (assuming you happen to have one), but the methodology applies to other devices such as certain Texas Instruments calculators. If not, then you’ll have to spend extra cash on a downgrade jig.

Needed Supplies:
– Downgrade capable PS3 (NOR chipset PS3 with 3.55 or earlier original firmware)
– E3 kit (without SATA station, although the Limited edition would work)
– microSD, microSDHC, or TF card (It is confirmed that the E3 flasher will work with 4GB cards)
– T8 Torx driver
– Phillips screwdriver
– CPU / GPU thermal paste (Arctic Silver, etc.)
– USB flash drive (must be in FAT32 format)
– Sony PSP (with CFW and PS3JIG installed)
– Scotch tape or similar (for E3 clip)
– Software bundle (everything you need, in one convenient megapack — see end of article)
PHASE ONE
Optional: Backup your PS3 data (if you don’t want to lose your saved games, etc.) because this process will reformat your PS3 hard drive.
– Eject any disc currently in your PS3!
– Install PS3Jig on PSP. If your PSP is on CFW then you should know how to do this already.
– Copy Samsung Multi-Console firmware (update.bin) for E3 onto your microSD card. Make sure this card is FAT32 formatted.
– Disassemble PS3. Please refer to the video below for a general overview of the entire disassembly / E3 installation / downgrade procedure:
– Install E3 clip (make sure pins are aligned before you commit!) This is one of the most critical steps. The clip must be oriented / aligned properly and be level with the motherboard or you will fail, possibly (in worse case scenario) even bricking your PS3. Some motherboards have resistors / capacitors that keep the E3 clip from being pressed down fully. You may need to carve tiny bits off the E3 clip with an X-Acto blade in order to get it to fit. Do not get carried away. Make sure to only remove small amounts of plastic, and only if necessary! The clip should be almost flush with the motherboard. Once you feel like the clip is seated securely and appropriately, place some tape over the clip to keep it locked into place.
– Install the E3 softboard into the PS3 hard drive caddy. You will need to unscrew the hard drive from the caddy to remove it. Use those same screws to attach the softboard to the caddy.
– Reassemble PS3. Refer to the video again for help, if necessary. Note: There will be no hard drive in the bay, only the E3 softboard (in the hard drive caddy). Place the caddy back inside the PS3 and connect the E3 ribbon cable to the softboard. It will click into place. This can be difficult with the amount of space given, so be patient.
– Connect the E3 Cover Board to the front of the softboard / hard drive bay. There is no need to connect a hard drive to the eSATA port.
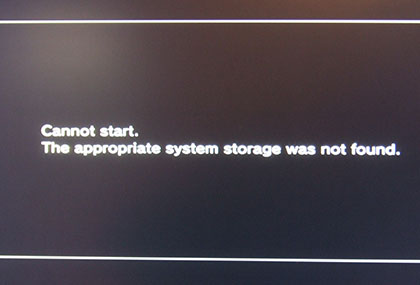
– Test to see if PS3 boots to this error screen: “Cannot Start. The appropriate storage system was not found.” (Yes, it’s supposed to.) Turn off PS3.

– Flash E3 board firmware:
Put microSD card into E3 Cover Board, flip all switches up except switches 1 and 2. Turn on PS3 and wait for “system storage error” again. Wait for a second and then turn off PS3.
– Make dumps:
All switches down on E3 except 3rd switch. Turn on PS3 and wait for “storage system error” again. Press “Start” on Cover Board. Wait for a couple minutes as all 8 LEDs progressively light. When it’s done the LEDs will begin flashing alternately. Turn off PS3.
– DOUBLE CHECK AND VERIFY DUMPS!! ABSOLUTELY CRITICAL STEP!!!
Have someone knowledgeable check your dump (bkpps3.bin) or use Flowrebuilder and HxE (read more, if you’re ambitious). DO NOT DEPEND SOLELY ON E3 DUMP CHECK SOFTWARE! If you are successful once, then do it again and compare to make sure your E3 is rock-solid and dependable.
As an extra precautionary step (highly recommended), run your NOR through BwE NOR Validator. It’s much, much better than the E3 Dump Check Tool, and you just can’t be too careful when it comes to verifying your NOR dump.
– Put these dump files somewhere safe. BACK THEM UP! These dumps are the only thing that may save you from a bricked console in the future.
– Patch bkpps3.bin with Rogero’s Nor Dump Patcher and copy to microSD, and put back into E3. Flip all switches down and turn on PS3. Wait for “system storage error” then press “Start” on E3. Wait for a couple minutes as all 8 LEDs progressively light. When it’s done the LEDs will begin flashing alternately. After it’s finished, check the log which is saved on the mircoSD which will tell you if the writing process was successful or not – this may or may not be a valid indicator.
Note: The E3 doesn’t really downgrade the firmware, per se. It’s really just unlocking factory service mode for us so we can use a downgrade dongle to bootstrap our CFW install.
– Now you can remove the E3 entirely (even the clip), but you will at least need to remove the E3 softboard so you can put the hard drive back into its caddy. I personally left the E3 clip installed, but (gently) folded the ribbon cable out of the way so the hard drive will fit back into its bay properly. This requires taking the PS3 partially apart and reassembling it again, obviously. If you do leave the clip installed, take care not to pinch it between two parts, and make sure none of the metal contacts are touching anything that could cause an electrical short circuit. I taped some paper over the connectors, just to be safe. This is covered in the video, if you need to review it.
Note: Consider reapplying thermal paste since you shouldn’t need to disassemble the PS3 again (just a little bit goes a LONG way)
PHASE TWO (FACTORY SERVICE MODE FIRMWARE INSTALL)
– Remove powercord from PS3 (if you haven’t already)
– Put PSP with PS3JIG already running into the right-most USB port (closest to the Blu-Ray drive)
– Plug in powercord on the PS3 again
– Press the Power button on front of the PS3 then press eject (in under a second), this triggers the FSM exploit / jailbreak mode. You should hear three quick beeps.
– On the PSP you should see challenge / response codes, and a few seconds later the PS3 should turn itself off. If not, then go back to the first step and keep retrying. PS3JIG does work, but not always the first time. Try it over and over using different timings on the Power / Reset button press / hold combo. This part can be INCREDIBLY frustrating!!! Try using PS3Jig (NabNab) if you have a PSP with a CFW higher than 5.50. If it absolutely refuses to work after many attempts, then you might have to breakdown and buy a downgrade jig.
Note: The challenge / response codes alone are not proof of success. If the PS3 did not turn itself off automatically, then the process did not work.
– Copy Lv2diag.self (version 1) and PS3UPDAT.PUP (see note) to root of USB stick. Put it into right-most USB.
Note: PS3UPDAT.PUP is the CFW of our choice, and Lv2diag.self tells FSM to install that firmware. The PS3UPDAT.PUP must be a CFW with no syscon checks! Rogero 3.55 (v3.7) is suggested (which is why it was included with the downloadable software bundle).
– Turn PS3 on and it will automatically install the firmware you had put there. You will not have anything on the screen, you can only tell it is installing by the flashing USB and PS3’s HDD light. PS3 will turn itself off after finishing the firmware installation (if it flashes red the firmware did not install correctly). A logfile should be present in root of the USB Mass Storage Device with no errors.
– Now we need to copy a different version of Lv2diag.self to the USB stick. This version will turn off FSM and put us back into normal PS3 mode. Just erase the old Lv2diag.self and PS3UPDAT.PUP from the USB stick and copy the Lv2diag.self (version 2) file to the USB drive, put it in the right-most USB port of the PS3, and power it on. The PS3 should turn itself off again.
Note: If the logfile looks like that firmware flash was successful but you’re remain stuck in FSM after this step (possible, but unlikely), then you -may- need to copy a different version of Lv2diag.self to the USB drive. You just need to find an appropriate one for your specific console revision. This may require some research.
– If your PS3 now boots to a Sony screen then pat yourself on the back. You made it!
Note: I suggest installing Multiman and then Rogero 4.55 (included) or the newest HABIB CFW after successful downgrade, but you can take various approaches like setting the QA flag and going back to 3.55 OFW, or you can just leave well enough alone.
ADDENDUM
The method presented in this article is an older method, preserved for academia. It still works perfectly well, but the FSM/dongle/PSP step is now unnecessary. All you need to downgrade now is an E3. Included in the software bundle is an autopatcher that lets you skip the FSM step and go straight to Rogero 4.55 (both the CFW and the patcher are in the Extra folder). Simply drag-and-drop your extracted NOR onto the autopatcher which will both validate and patch your NOR. Flash the newly patched NOR back to the PS3 with the E3 and you can then install 4.55 on boot, bypassing factory service mode. Much easier!!!
Download the software bundle below.
Accessing our premium content requires a password. To receive the password, please Like us on Facebook and send a message to our page.


