


Please read all the instructions before preceding. There is a definite danger of altering your phone in a non-desirable way — from loss of all functionality, to loss of data, to loss of some features, to voiding your warranty, to being stuck on the wrong cellular network, etc.
If you have a stock Samsung Mesmerize (U.S. Cellular’s version of the i500 series) then you are most definitely limited to an outdated Android OS codenamed Gingerbread. If you’re feeling adventurous and want to update to the more modern Jelly Bean, then here’s a step-by-step guide. This won’t work on every i500, only the Mesmerize. Even though the principles are very similar for the Fascinate, etc. you will potentially brick your phone if you attempt this on anything but a U.S. Cellular i500.
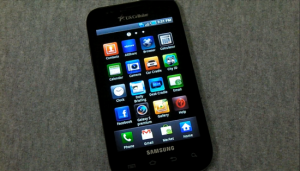
Samsung Mesmerize
If you are feeling the hacker spirit and wish to continue, then you will need to obtain various software utilities. We have conveniently bundled all these utilities into one pack which is available at the bottom of this article.
PREP STAGE:
Inside the download bundle you will find a selection of software to install to your Windows computer. Please install the following programs:
Odin3 v1.83
Samsung Mobile USB Driver V1.3.550.0 SCH-i500 Mesmerize
Samsung Drivers (either the x86 or x64 package dependent upon your Windows OS version)
Also place “cwm-recovery-ALL.tar” on your desktop or in another convenient folder. We will be using it with Odin.
Now connect your phone to your computer using a USB cable, and enter “Mass Storage” mode. Please copy the following files to the SD card in your phone:
cwm4_fixed_for_cm7-CWM.zip
Framaroot-1.4.1.apk
cm-10.1-20130717-NIGHTLY-mesmerizemtd.zip
gapps-jb-20130301-signed.zip
PHASE ONE – ROOTING:
Assuming that you have never modded your phone at all before, then you first need to Root it. All this does is unlock various restrictions and allows you “Admin” or “Superuser” privileges, i.e. lets you have total control of the device you own.
First you will need to make sure you can run apk files that are not from Google Play. Go into your phone Settings menu and check “Unknown Sources”. Also go to Settings / Applications / Development / USB Debugging and make sure that is enabled.
Open your File Management app, and run the Framaroot-1.4.1.apk file we previously copied to your phone’s SD card. Follow the install instructions and then run the Framaroot app. You will (hopefully) see a list of exploits named after Lord of the Rings characters (Legolas, Aragorn, etc.) Select one of the exploits listed and run it. Attempting Aragorn should work, but if it fails then try any other available exploits. It’s almost certain that one will succeed.
Wait a few minutes for the app to process and restart your phone. Yay! You should be a Superuser now!
PHASE TWO – DOWNLOAD MODE:
Open the Odin application that we installed earlier on your PC. Click on PDA, then browse to find the “cwm-recovery-ALL.tar” file. Double-check to make sure the option “Re-Partition” is NOT checked.
In order for Odin to flash this CWM recovery file to our phone, we must enter “Download Mode”. We have to do a few strange things to enter that mode. First, remove your battery. Second, plug in the USB cable to ONLY your phone (not the computer at this time).
While holding both the Volume Up and Volume Down buttons, put the battery back into the phone and then plug in the other end of the USB cable to the computer. You should see the Download mode screen pop up.
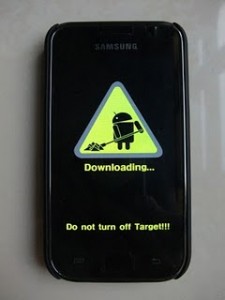
Android OS – Download Mode
If you see only the standard “charging battery” graphics then you are not in Download Mode. Try the steps again.
Once connected, hit the “Start” button on Odin and wait for the recovery to flash. The phone will reboot, and then you can disconnect it and close Odin.
PHASE THREE – RECOVERY MANAGER:
Turn off your phone. Use the following hotkey combo to enter our freshly installed Clockworkmod Recovery (aka CWM):
On your phone, hold down the Volume Up and Volume Down button and then start holding the Power button as well. Wait until the Samsung splash screen appears and then let go of the Volume Up button (while still holding the others). You can let go of the buttons when you see red text appear that says “2.5.1.x Voodoo Lagfix”. Now you’re in recovery mode. We will be using the Volume Up / Down as up and down arrows to highlight a menu choice, and the Power button to select it.
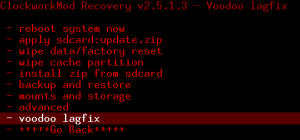
CWM 2.5.1.x (Red)
The first thing to do in recovery mode is do a NANDroid backup. This saves your phone as it is currently, in case you want to roll your phone back to how it was before you started messing with it. To perform this backup, select Backup and Restore, then Backup again. Go back to the main recovery menu after the backup process is completed.
Now that we have a backup to fall back on, we want to update our CWM to a more usable version. The method for this is the “Install Zip from SD” option in CWM. So choose that, and then it will ask us to select a file, and we will choose “cwm4_fixed_for_cm7-CWM.zip”. It will ask us to confirm our selection, which we will do. This will update and bring us back to recovery mode, but our screen text will no longer be red – this means we are on CWM4 instead of CWM2.
We’re really starting to get there! Only a few more steps to go, but they are quite important, so read carefully, and follow them precisely.
We are now going to update CWM4 to CWM6, but since CWM6 is part of the Cyanogenmod version of Jelly Bean that we are attempting to install, we must prepare to install Jelly Bean. The steps for this are as follows:
First, select “wipe data/factory reset”, then confirm your selection. This will take a few seconds to do. After it is finished, go back to the CWM main menu.
Second, select “wipe partition”, then confirm your selection. This will take just a moment. After it is finished, go back to the CWM main menu.
Third, select “advanced”, then “wipe dalvik cache”, and confirm your selection. This should be very quick. After it is finished, go back to the CWM main menu.
Fourth, select “Install Zip from SD”, select “cm-10.1-20130717-NIGHTLY-mesmerizemtd.zip”, and confirm your selection. This starts the ROM installation procedure, but it will not fully complete, because it needs to install CWM6 first.
After it is finished installing CWM6, your phone will reboot into recovery. Yet again, our CWM screen should look different.
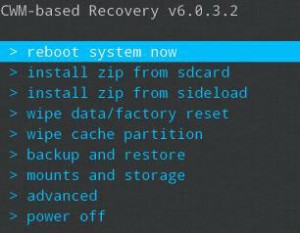
ClockworkMod 6
Now we are on CWM6 (but not on Jelly Bean yet), so we will need to finish our procedure.
Repeat the entire procedure of wiping data, partition, and dalvik cache. Then repeat the “Install Zip from SD”, once again selecting the same “cm-10.1-20130717-NIGHTLY-mesmerizemtd.zip” file. Now that we are running CWM6 the Cyanogenmod Jelly Bean installer should be able to finish in full.
Once Cyanogenmod Jelly Bean has finished installing, you may choose “Install from SD”, and select “gapps-jb-20130301-signed.zip” if you so desire. This installs the Google apps package. This isn’t mandatory, but it may be useful to you.
That’s it for what we need to do in recovery mode, so return to the main recovery menu and select “reboot system”. The phone will then boot into Jelly Bean with a Cyanogenmod flash screen. You should be aware that this first boot sequence will take about five minutes to configure.

CyanogenMod 10
Enjoy your new updated and unlocked Samsung Mesmerize!
Returning to Previous ROM:
To go back to your previous ROM, boot into recovery, select backup and restore, and then restore your backup. This will put you back on your original OS and restore your files
Note: This will leave your Root access as well as your current CWM.
HOW TO DOWNLOAD THE GINGERBREAD TO JELLY BEAN SOFTWARE PACK:
Accessing our premium content requires a password. To receive the password, please Like us on Facebook and send a message to our page.