


Fortunately, advances in technology have made things easier, and custom content for the EOS family can now be made entirely on a personal computer without resorting to any SCSI trickery.
This method is especially useful for getting content from computers without SCSI onto machines which do not support the FAT file system (typically classic models).
Why can’t you just be FAT like your brothers?!
Step 1
Create (or load) the custom banks using Emulator X3 or a FAT-compatible EOS sampler. A model without FAT support can be used to create the banks initially, but will ultimately need to be loaded into a sampler with FAT support for transfer anyway.
Step 2
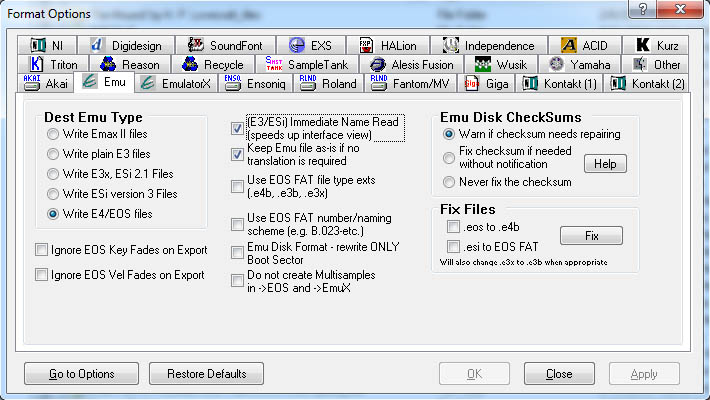
If using Emulator X3 then “File/Export” the banks as E4B format files, or if using a FAT-compatible sampler then connect its drive to the computer and copy the E4B files over.
Note: A standard (non-FAT) EOS sampler cannot be used for this as its drive is in a proprietary format typically unreadable by computers.
Step 3
Launch Translator. Hit
Step 4
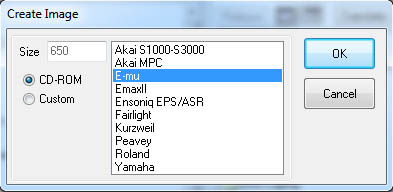
In Translator, choose the menu item “Tools/Create Virtual Drive/New”. Choose “E-mu” as the image type, and pick CD-ROM (650MB). A smaller size can be manually entered if the total size of the banks is smaller than 650MB, but there’s not much point with large modern hard drives and ZIP/RAR compression schemes. Name the img file something appropriate like “my_EOS_CD.img” or similar.
Step 5
In Translator, choose the menu item “Tools/Register Items/Virtual Drives/Single” and browse to the newly created CD img file.
Step 6
In Translator, browse to the folder containing the E4B files using the left window. The E4B files should appear in the right window.
Step 7
In Translator, select all the E4B files in the right window and drag them to the mounted E-mu format virtual drive in the left window.
Note: It may be necessary to scroll up in the left window to make other folders/drives visible first. Also, take care not to click any folders or files in the left window as that will navigate out of the E4B files in the right window. Yes, Translator is rather finicky and error prone (to put it politely).
Step 8
After Translator is finished copying the E4B files to the virtual drive, close Translator. In Windows, rename the img file to an ISO file.
Note: To do so, file extensions will need to be visible in Windows Explorer, if they aren’t already.
Step 9
Use ImgBurn to burn the ISO to CD-R. The ISO can also be tested using CDxtract, Kontakt, or Extreme Sample Converter.
ADDENDUM
This is one known method, not necessarily the easiest or best, and other approaches can certainly be taken.
Depending on the equipment and software at hand–as well as the exact intended result–ideas involve using EMU3FS and EMU3BM under Linux, using EMXP to author EIIIx volumes, variants of the traditional SCSI method, USB/IDE ZIP drives, etc.