Goodbye floppies?
The problem most people will run into is that Total Commander/EnsoniqFS cannot access more than one partition of an Ensoniq configured SCSI2SD card. There are a couple complicating factors which contribute to this. The first is that SCSI2SD does not create partitions, but rather the configuration file simply allocates a range of sectors. The second is that EnsoniqFS expects that each physical disk is dedicated to one–and only one–Ensoniq volume.
Therefore, each Ensoniq volume is assumed to be at the very start of the disk. EnsoniqFS will not be able to identify multiple volumes, or find a single volume starting at any other location.
Note: While the EPS/ASR treats these sector ranges as separate physical drives via the SCSI2SD interface, keep in mind that a Windows/OSX/Linux computer does not. To a PC, these “drives” are not actual physical drives, but rather just one large unallocated block of data on an SD card.
How frustrating!! There are multiple methods which can provide a solution, but outlined below are some potential strategies.
Note: Regardless of the strategy chosen, step one and step two of the virtual drives method contains especially valuable advice and is a highly suggested read for a fuller understanding of all concepts.
STRATEGY — SCSI ADAPTER
Instead of trying to avoid SCSI by using the SCSI2SD card, actually use the SCSI2SD device as a genuine SCSI device. The biggest drawback is that this is only possible with a computer containing a SCSI adapter, and requires the SCSI2SD device to be external (or otherwise able to be connected to the same SCSI bus as the computer).
However, it has the great advantage of being the most “authentic”, direct, and universal means of drive management, as this method is how SCSI content was designed to be accessed. It’s arguably the preferable strategy, as the SCSI2SD adapter will present all SCSI IDs as separate physical disks.
STRATEGY — PROXY DRIVE
It is possible to use EnsoniqFS to copy content to the only visible microSD “drive” (which is more-or-less used as a temporary/scratch disk) and then use the EPS/ASR sampler’s built-in ‘Copy SCSI Drive’ command to clone the first “drive” to the fourth “drive”. Repeat the process by copying all new content to the first drive, and then the ‘Copy SCSI Drive’ command to clone the first drive to the third drive. Yet again, repeat the process by cloning new content from the first drive to the second drive, and finally just by copying new content to the first drive in its final form.
This method is labor intensive and rather slow as the EPS/ASR read and write speed is much slower than the computer, and also requires multiple copying stages which are otherwise unnecessary when copying directly to the intended SCSI drive instead of by proxy.
Another drawback is that it is rather difficult to make further extensive revisions (full CD copying, etc.) to the second, third, or fourth drives once the data has been committed, as they are then accessible only to the sampler.
STRATEGY — VIRTUAL DRIVES
This is by far the most technical method, but does not require a computer with SCSI nor the very long copy times required by the proxy drive technique.
STEP 1: PARTITIONING & DIRECTORY STRUCTURES
On the PC, either create a new SCSI2SD card configuration, load a configuration (from XML), or read out a currently working configuration from the SCSI2SD device. Make special note of both the start sector and number of sectors assigned to each SCSI2SD “Partition” and which SCSI ID is assigned to it — write them down. Save the configuration back to the SCSI2SD device if (and only if!) this is a new setup.
If this is a new SCSI2SD setup, use the EPS/ASR to format and label each 2GB “drive” as appropriate. Remember, each drive will be accessed under a different SCSI ID number.
Plan your directory structure for each EPS/ASR drive. Since each drive can only hold 2GB, only a select amount of source material (CD-ROMs, Zip disks, etc.) can be copied to each drive, and the limit is dependent upon the combined size of the content. For example, if CD-ROMs are the source of content, and each CD holds its maximum size of 650MB (unlikely, in practice) then only three CDs will be able to copied to an individual drive.
On the EPS/ASR, create the desired directory structure. When dealing with CD-ROM sources, it is ideal to create a separate directory with a name matching the title of each CD-ROM to be copied to the drive, such as “EPS BEST-OF”, “ASR BEST-OF”, “TRANSWAVES”, “WAVEBOY”, and so on. Likewise, it is good practice to create directories for groups of EFEs with similar content or sources.
STEP 2: TOTAL COMMANDER & ENSONIQFS
Once all four drives have the proper label and directory structure, put the SD card in the PC and run Total Commander with elevated permissions (as admin). Within Total Commander, use the right-side panel to select Network Neighborhood and Ensoniq Filesystem. Access the contents of the first Ensoniq partition on the SCSI2SD card. The directory structure created on the EPS/ASR should be visible, as well as the operating system EFE.
If applicable, use the EnsoniqFS tools to mount any CD-ROM ISOs needed for copying to the first Ensoniq partition. If physical CDs are the source then place those into the optical media drive of the computer.
Using the left-side panel in Total Commander, again use Network Neighborhood and EnsoniqFS to access the source content (virtual CD-ROM, physical CD-ROM, Zip drive, etc.) to be copied to the SCSI2SD card.
Explore the source content so that the directory structure and EFEs are visible. Select all folders and/or EFEs desired in the left-side, and copy them into the corresponding destination directory on the right-side panel; the right-side panel should currently be showing the contents of the first Ensoniq “drive” on the SCSI2SD card.
Once the first Ensoniq “drive” has the proper content, eject the SCSI2SD card and access the first SCSI2SD drive via the EPS/ASR sampler. Double-check that the contents are accessible and laid out properly before moving to the next step.
When everything is correct on the first Ensoniq drive, place the SCSI2SD card back into the computer.
STEP 3: RMPREPUSB
Note: Although RMPrepUSB is an excellent choice, it is possible to achieve the same result with other utilities capable of accessing raw sectors, but that is outside of the scope of this article.
Download and extract RMPrepUSB Portable to its own folder. The utility is portable, so no installation is required. Start the program simply by by double-clicking “RMPREPUSB.exe” — elevated privileges (run as administrator) are required.
Within RMPrepUSB, the SCSI2SD card should be listed as a removable drive in the top of the window.
Use the “Image Tools” in RMPrepUSB to clone the sector ranges corresponding to SCSI2SD partitions B, C, and D to raw image files (three total — one per each “partition” except the first). Mount the partition images in Total Commander and copy the desired content. Now use RMPrepUSB to write each image file back to the corresponding sector range on the SCSI2SD card.
Note: The sector values are the same numbers used within the SCSI2SD configuration which were (hopefully) written down. Each partition always has a unique starting sector, but the size/length of each partition is ideally the same. This depends on the exact SCSI2SD configuration, so do take special care.
For example: SCSI2SD Partition C is commonly set to starting sector 8388608 with a size of 4194304 sectors. So within RMPrepUSB, use Drive -> File to copy exactly 4194304 sectors from starting sector 8388608 to a file named “Ensoniq-C-ID2.img” and mount that as a virtual drive within EnsoniqFS. When done changing the contents of the virtual drive, use RMPrepUSB to write “Ensoniq-C-ID2.img” from File -> Drive, making sure to select the same sector starting point!
Partition A typically does not need to be read or written using RMPrepUSB because both Total Commander/EnsoniqFS (as well as Translator 6, incidentally) can access Partition A without any special considerations.
Altering partitions B, C, and D takes longer than Partition A because each must ultimately be read/written back to the SCSI2SD card a full 2GB at a time, as the virtual drives are acting as proxies because EnsoniqFS cannot access partitions B, C, or D on the SCSI2SD card directly.
In a way, this might actually be advantageous because the virtual images can be used as data backups, if so desired.
Note: Technically, any raw imaging ‘dd’ type utility can be used instead of RMPrepUSB, such as ‘dd for Windows‘ or even ‘dd’ itself under Linux, but RMPrepUSB has an convenient GUI and works cleanly under Windows.
For a pre-configured SCSI2SD XML, four ready-to-go formatted and bootable Ensoniq partition images (EPS16 and ASR10/ASR88), RMPrepUSB, and detailed step-by-step instructions on Ensoniq drive/partition content management and microSD creation, download this Ensoniq SCSI2SD Content Management Tutorial and Starter Pack.
For those planning on using up-to-date versions of Translator (or Translator Free) which directly support multiple SCSI2SD volumes, refer to this Translator SCSI2SD microSD Ready-To-Go pack containing bootable full drive images (EPS16 and ASR10/ASR88), configuration settings, and a step-by-step formatting guide.
TROUBLESHOOTING
ISSUE 1 – ENSONIQFS
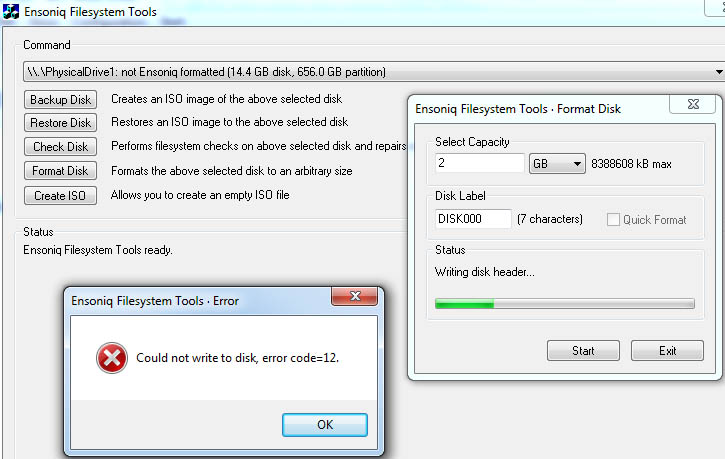
EnsoniqFS will not be able to format SD cards to Ensoniq volumes if the SD cards have already been formatted to another filesystem such as FAT32, NTFS, exFAT, or HFS.

Attempting to do so will result in “Could not write to disk, error code=12” from EnsoniqFS.
ISSUE 2 – TRANSLATOR
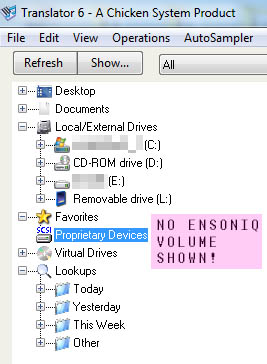
Translator may not be able to identify SD cards which were not specifically formatted to Ensoniq by Translator itself. It is possible to create Ensoniq volumes on a SCSI2SD card by formatting directly on an EPS16+ or ASR which Translator cannot accurately identify as being Ensoniq volumes!

This error is fairly rare as most users will initially format an Ensoniq SD card with Translator, but the error can happen on both older and newer builds of Translator when attempting to access an Ensoniq SCSI2SD card created strictly using an Ensoniq sampler and SCSI2SD by themselves.
SOLUTION
Both errors have the same root cause and can be fixed with the same solution. Download this utility (and clear instructions) which quickly restores the expected Ensoniq signature to the sector 0 area of the SD card.


