


If the SCSI2SD device is not yet configured and working with the ESI, please see the SCSI2SD XML section at the end of the article.
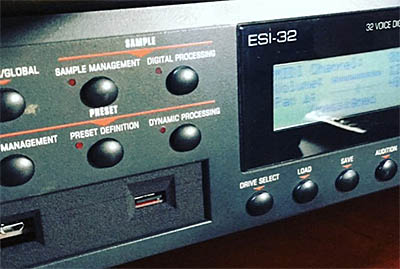
No more floppy or Zip?
As usual, there are multiple approaches and various methods which can be used to do so, but a few to consider are listed below.
TRADITIONAL METHOD (CD-ROM)
Negatives
Requires extra equipment in the form of a SCSI CD-ROM drive, and also creating a disc library of CDs. Requires lots of manual copying via the ESI unit itself.
Positives
This is the closest method to what E-mu envisioned for bank management, so no special conversions or formatting tricks are necessary. As such, it is a method which also works for ESI units with physical hard disks rather than strictly SCSI2SD.
– Burn ISO (or bin/cue) to CD-R using ImgBurn, Toast, Nero, or similar image burning program. Do not write the ISO as an ordinary file, but as an entire disc image!
– Put CD-R in a SCSI CD-ROM drive connected to the ESI.
– Load bank from CD-R, and resave bank to any available SCSI2SD volume.
Custom content can be imported by using EMXP to create a CD (650MB) sized ISO with various EIII/EIIIx banks and then writing it to CD-R for import on the ESI.
ESIWIN METHOD
Negatives
Requires a legacy (Windows XP or older) computer with a SCSI adapter installed. Does not directly support SCSI2SD, so the ESI unit must be connected to the computer via SCSI.
Positives
Understands ISO images and ESI volumes and can operate on them directly. Like the traditional method, this also works on ESI machines with physical hard disks rather than SCSI2SD.
– Connect ESI to computer via SCSI.
– Get SimplyData EsiWin
– Install and run EsiWin.
– Mount desired ISOs with “Add ISO” feature.
– Copy content between ESI and computer (generally from ISOs) with Import/Export banks feature.
RAW COPY METHOD
Negatives
Like the traditional method, this requires lots of manual work to resave each bank. Writing the ISOs to microSD/SD can be a technical obstacle for some users, depending on the “dd” utility being used.
Positives
Does not require a (potentially expensive) SCSI CD-ROM drive, nor burning CD-Rs. Also, this is very close to the traditional method, so it also requires no special conversions or formatting tricks.
This assumes either multiple microSD/SD cards, or that one microSD/SD card has been configured with at least two volumes (usually 4GB each, but not necessarily). This method essentially treats one volume of the SCSI2SD card as a virtual CD-ROM, and the other volumes (or another card) as hard disks.
– Use a ‘dd’ style computer utility like RMPrepUSB to write an ISO to the start of one of the SCSI2SD volumes on the microSD/SD card, or the start of a spare card. The first volume is usually the easiest as it is normally at the very start of the microSD/SD card (sector 0).
– Put the newly written microSD/SD card into the ESI, and load the virtual CD-ROM content from the first SCSI2SD volume.
– Resave the content to either a separate microSD/SD card, or any other volume(s) on the same microSD/SD card.
– Repeat the process, overwriting the “virtual CD-ROM” partition each time with a new ISO.
Note: Technically, any raw imaging ‘dd’ type utility can be used instead of RMPrepUSB, such as BalenaEtcher, dd for Windows or even ‘dd’ itself under Linux, but RMPrepUSB has an convenient GUI and works cleanly under Windows.
EMXP SCSI2SD METHOD
Negatives
The current version of EMXP now fully supports ESI models, so the only negative to EMXP is that some people do not like the lack of GUI interface, or are otherwise unfamiliar with how to use the program.
Positives
Does not require any extra hardware, and bank management is entirely computer based which tends to be much quicker than manual copying on the ESI itself.
– Get EMXP.
– Put microSD/SD card into computer.
– Install and run EMXP.
– Use Windows Explorer to move/copy all desired E-mu EIII/EIIIx/ESI ISOs into EMXP’s “Images” sub-folder.
– Within EMXP:
6. Preferences | 4. Manage File/Drive Preferences | 4. Define SCSI2SD related settings | 1. Define SCSI2SD device configurations.
Use spacebar to select a configuration slot, and press enter. Now create a SCSI2SD configuration which matches the SCSI2SD’s internal settings being used with the ESI.
Note: These settings are usually applied to the SCSI2SD via an XML, so those values ordinarily will match.
Mirror the SCSI2SD’s internal settings!
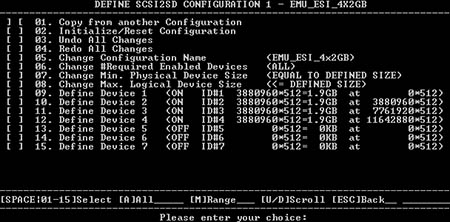
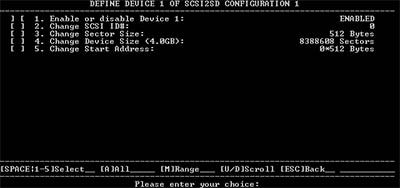
To do so, define each SCSI2SD ID using Define Device menu options 09-15. Do not forget to change each device to ENABLED while setting the size of the volume.
For example: An 8GB microSD/SD card might be split into two volumes, so use option 09 and 10 to enable and define two SCSI IDs. A 16GB card will often be split into four volumes, so use option 09, 10, 11, and 12.
Enable and configure per SCSI ID
The sector count is the most important, as EMXP can automatically calculate the starting address if asked to do so, and the sector size will always be 512. Do make sure to change the start address, or else all the SCSI2SD volumes will overlap each other!
In an attempt to be helpful, EMXP is often too overprotective. By default, unless the SD card perfectly matches the SCSI2SD configuration in EMXP, the configuration will be rejected when attempting to apply it. To make EMXP more lenient, change to these settings from within the “DEFINE SCSI2SD CONFIGURATION MENU”:
06. Change #Required Enabled Devices
2. Yes. Accept Disks/Images with Room for at least one Enabled Device07. Change Min. Physical Device Size
2. Yes. Accept Devices with a Size smaller than the Defined Size08. Change Max. Physical Size
2. Yes. Devices can have a Logical Formatted Size > Defined Size
Read the troubleshooting section for a detailed explanation of why this is generally helpful, and also when making EMXP more lenient may not actually be desirable.
Before proceeding, make sure all SCSI2SD devices on the SD card have been formatted via the ESI, if the SD card has never been previously used with the ESI. Windows may prompt “You need to format the disk in drive X: before you can use it” upon inserting an SD card with E-mu ESI volume on it, but do not ever allow Windows to do so. EMXP wants the SD card exactly as it is. That is to say, EMXP needs ESI compatible volumes to be present on the SD card, and Windows would destroy them.
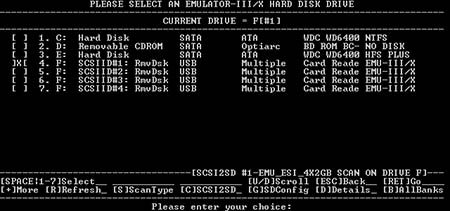
1. Manage EMU Files and Disks | 5. Manage EMU EMULATOR-III/EMULATOR-IIIX Files and Disks | 4. Manage EMULATOR-III/X Hard Disks
Choose the Removable Drive which matches the SCSI2SD card. Select the menu option [C] SCSI2SD from below and then choose the newly defined SCSI2SD configuration to apply it to the Removable Drive.
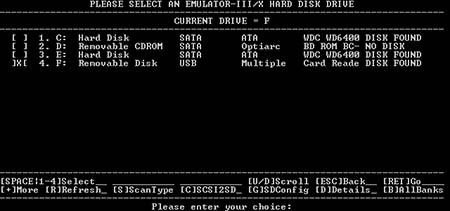
Select microSD/SD card drive and then apply configuration.
– Use EMXP to copy banks from other EIII/EIIIx volumes (ISOs) to the SCSI2SD.
1. Manage EMU Files and Disks | 5. Manage EMU EMULATOR-III/EMULATOR-IIIX Files and Disks | 3. Manage EMULATOR-III/X Hard Disk Images | 1. Manage existing EMULATOR-III/X Hard Disk Images
Select all desired banks from an ISO and use the EMXP copy feature. Choose “EMULATOR-III/X Hard Disk” as the destination type. EMXP will prompt to select the target drive — in this case, the SCSI2SD removable disk.
Note: Each time the drive containing the microSD/SD card is selected, the SCSI2SD card configuration needs to be applied to reveal the contained EIIIx/ESI volumes. These volumes will all have the same drive letter as each other because they’re all part of the same disk as far as the operating system is concerned; only EMXP and the ESI are aware of these E-mu volumes.
Multiple E-mu volumes on one drive.
Select one of the E-mu volumes now listed as an option to commence with the bank copying!
Special note: Older versions of EMXP are limited to only EIII/EIIIx, but newer version support ESI specifically, so it may be beneficial to use the ESI specific menus which are now provided. If desired, use the same steps as above, but select the corresponding ESI menu rather than EIII/EIIIx where applicable.
EMXP ZIP METHOD
Negatives
Requires a Zip drive for the ESI, and also a Zip drive which can be connected to a PC (either IDE, USB, or SCSI depending on the computer). Subject to EIII/EIIIx bank limitations. Requires lots of manual copying via the ESI unit itself.
This method is particularly clumsy as the capacity of Zip volumes is smaller than CD, and requires excessive disk “juggling” between ESI and PC.
Positives
Like the traditional method, this also works on ESI machines with physical hard disks rather than SCSI2SD; specifically, this method is ideal for ESI machines with internal Zip and mechanical hard drives rather than SCSI2SD.
– Use EMXP to copy EIIIx banks to a Zip disk using a PC connected Zip drive.
– Load Zip disk into Zip drive connected to ESI.
– Copy banks from Zip to ESI.
TROUBLESHOOTING & TECHNICAL INFO
A significant issue with SCSI2SD configurations is that SCSI2SD has no way of knowing what capacity SD card is going to be used, nor the volume limits of the sampler in question, so there are no safeguards in place to prevent defining devices which are too large to be proper.
A common misconception is that the stated capacity of an SD card is numerically accurate and certain, and that two 4GB devices will fit perfectly on an 8GB card, or four 4GB devices will fit on a 16GB card. After all, 2 devices x 4GB per device equals 8GB, and 4 devices x 4GB per device equals 16GB. Or does it?
When looking at the amount of available sectors on an 8GB SD card, it can be seen that the capacity is not sufficient for two 4GB devices, but actually closer to 3.6GB per device! This means that the first device needs to be configured as 4GB with the second device as a smaller size, or both the first and second devices need to be the same 3.6GB (approximately) size.
Likewise, 16GB cards suffer the same issue. Users will typically attempt to create four 4GB devices, but in practice, only the first three devices are actually 4GB and the last device does not actually fit properly on the drive, although SCSI2SD will not give any warnings about this as it is unaware that there is not enough room on the SD card!
8388608 sectors per 4GB device * 4 devices = 33554432 total sectors. If the amount of sectors on a 16GB SD card is 30228480 then there are 3325952 too few sectors available. In other words, given the way most people configure their SCSI2SD, the fourth and last device is secretly short by a very significant 1.5 GB!
The SCSI2SD unit will report the expected size to the sampler, but when it comes time to access the end portion of that device, the needed sectors will not be available on the SD card which means the data is being read/written to/from invalid space. It would appear that the great majority of SCSI2SD users are walking their last device ID straight off a cliff!
Contrary to intuition, the only way to get four SCSI2SD devices with the maximum volume size of 4GB (as allowed by EMXP) is to upgrade to a 32GB SD card.
Segue to EMXP and its well-meaning safeguards…
By default, EMXP attempts to validate that the SCSI2SD configuration matches the SD card properly. Note that neither the SCSI2SD unit itself, not the sampler generally bother to do the same, so although everything may appear to be properly configured, EMXP is a lot more vigilant and will try to protect the end-user.
Multiple issues arise from this:
– EMXP will not apply a SCSI2SD configuration which defines more needed storage than is available on the SD card.
– EMXP will not apply a SCSI2SD configuration without room for all enabled devices.
– EMXP will not apply a SCSI2SD configuration if the formatting of a volume is reported as larger than the size of the corresponding device.
In a perfect world, this is how EMXP should indeed behave. However, due to faulty assumptions made by almost every SCSI2SD user (and no other safeguards against doing so), EMXP will almost always reject applied configurations unless these safety checks are first disabled. Changing these default preferences is the quick and dirty solution.
The proper way to remedy the issue is to redefine the device geometries in the SCSI2SD unit itself and then format the devices using the sampler. At this point, EMXP will cease to be confused by the apparently nonsensical requests, and should cooperate nicely.
Ideally, one would take the total capacity of the SD card (in sectors) and divide the value by the number of intended devices (usually 4, but not always) to obtain the perfect size volumes for use with SCSI2SD.
Examples
16GB SD card with 4 devices: 30228480 sectors / 4 = 7557120 sectors per device (3.60352 GB)
16GB SD card with 2 devices: 30228480 sectors / 2 = 15114240 sectors per device (7.20703 GB)
8 GB SD card with 4 devices: 15523840 sectors / 4 = 3880960 sectors per device (1.85059 GB)
8 GB SD card with 2 devices: 15523840 sectors / 2 = 7761920 sectors per device (3.70117 GB)
Note that using only two devices with a 16GB card gives a result of 7.2GB. This is fine for use with the ESI alone, but will not work in conjunction with the 4GB EIIIx limit of EMXP.
The key point is that, in practice, SCSI2SD devices almost always need to be approximately 3.6GB rather than 4GB.
As a side note, while EMXP has a 4GB limit, the ESI supports 29360129 sector (14GB) volumes. To maximize storage on the ESI, a 64GB SD card could be used in 14GB by four device configuration for a whopping 56GB! Again, this configuration cannot be supported by EMXP, so the ESI would be primarily self-contained.
EMXP-COMPATIBLE SCSI2SD XML FOR EMU ESI
Note: These need to be opened with SCSI2SD-util (v5.x boards) or SCSI2SD-util (v6.x boards) and flashed to the SCSI2SD unit.
The configurations supporting four devices is typically ideal, and should be used under normal circumstances.
8GB SD with two 3.7GB devices
8GB SD with four 1.85GB devices
16GB SD with four 3.6GB devices
The device SCSI IDs may need to be altered prior to flashing, depending on additional SCSI hardware (CD-ROM, Zip, etc.) and also because the E-mu ESI may be set to use conflicting IDs already, as it uses an “Avoid Host” ID and an ID for itself. These can both be assigned in the ESI unit’s Setup Menu, under SCSI configuration: [MASTER]->[SETUP]->[SCSI/DISK].